· Hakan Çelik · OpenCV / Computational Photography · 2 dk okuma
Image Inpainting
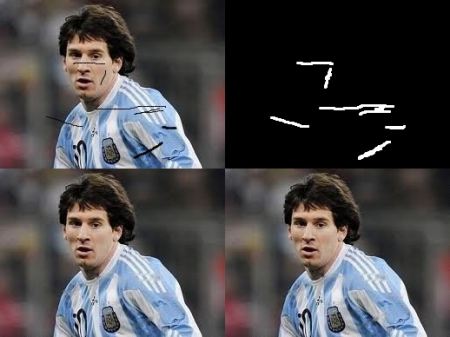
Image Inpainting
Goal
- Learn how to remove small noises, strokes etc. in old photographs by a method called inpainting
- See inpainting functionalities in OpenCV
Basics
Most of you will have some old degraded photos at your home with some black spots, some strokes etc. on it. We can’t simply erase them in a paint tool because it will simply replace black structures with white structures which is of no use. In these cases, a technique called image inpainting is used. The basic idea is simple: Replace those bad marks with its neighbouring pixels so that it looks like the neighbourhood.
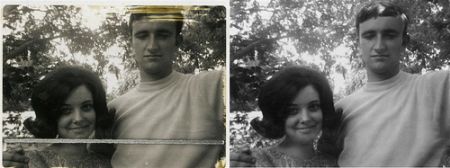
Several algorithms were designed for this purpose and OpenCV provides two of them. Both can be accessed by the same function, cv.inpaint().
Algorithm 1: Telea (INPAINT_TELEA)
Based on the paper “An Image Inpainting Technique Based on the Fast Marching Method” by Alexandru Telea in 2004. It is based on Fast Marching Method. Algorithm starts from the boundary of the region to be inpainted and goes inside gradually filling everything in the boundary first. It takes a small neighbourhood around the pixel and replaces it by normalized weighted sum of all the known pixels in the neighbourhood.
Algorithm 2: Navier-Stokes (INPAINT_NS)
Based on the paper “Navier-Stokes, Fluid Dynamics, and Image and Video Inpainting” by Bertalmio et al. in 2001. This algorithm is based on fluid dynamics and utilizes partial differential equations. It first travels along the edges from known regions to unknown regions. It continues isophotes (lines joining points with same intensity) while matching gradient vectors at the boundary of the inpainting region.
Code
We need to create a mask of same size as that of input image, where non-zero pixels correspond to the area which is to be inpainted:
import numpy as np
import cv2 as cv

img = cv.imread('messi_2.jpg')
mask = cv.imread('mask2.png', cv.IMREAD_GRAYSCALE)

dst = cv.inpaint(img, mask, 3, cv.INPAINT_TELEA)

cv.imshow('dst', dst)
cv.waitKey(0)
cv.destroyAllWindows()
See the result below. First image shows degraded input. Second image is the mask. Third image is the result of first algorithm and last image is the result of second algorithm: